The Launch X431 Pro Elite is the cheapest way of getting in the LAUNCH platform. With the launch software you are getting more consistent results.
These are the top tips and tricks that allow you to make best use of this diagnostic scanner, including how to change time zone, lower volume, show battery percentage, transfer file from tablet to PC etc.
1. Use the Back button
You need to be really friends with the back button, especially for these moments when the keyboard is on half of your screen the back button is your life savior. Also from time to time the tablet
wants to connect to your launch account and should you not have a WiFi connection hitting the back button will allow you to continue with your scanning.
2. Settings
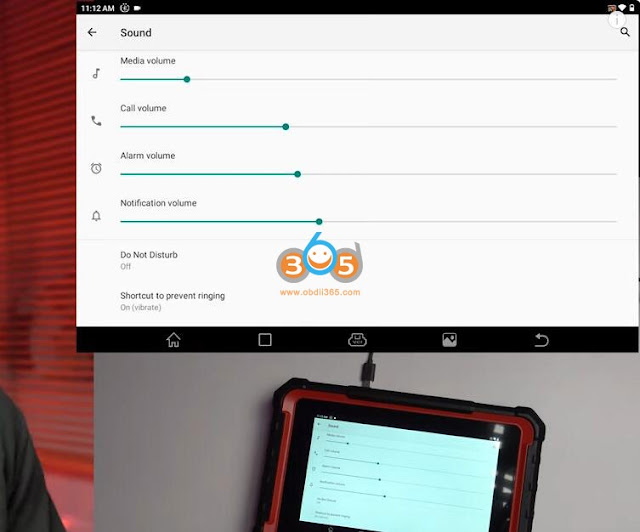
1). Lower volume
We start to look at settings and they’re not very intuitive. So drop the big top menu. Drop it the second time and find that little setting Mark.
It is useful to adjust the sound level because it is annoyingly high. You can adjust the sound to a comfortable level.
2). Battery percentage
If we want the battery percentage to be turned on, go to the Battery section.
So that we’re able to see on the top right hand corner the percentage of battery charge.
3). Time zone
Another thing that we need to consider and make sure that we have correctly is the time zone of our system. This is especially important if you’re doing work on BMWs.
If you’re resetting the maintenance schedules the software is adjusting the time on the vehicle based on the time of your tablet (system date and time). Make sure that you have the right time zone so that you have the right time and date on your tablet.
Go to System section->Date & Time to set time zone.
4). Diagnostic report
Normally you would expect your reports and your scans to be in Diagnostic History. Some of them will be there, some of them will be on the cloud.
When you’re doing the intelligent scanning but many of them will be in the User Info tab in health reports. You can also see the recorded data for your data logging.
3. Transfer data from tablet to PC
How can we connect The Launch X-431 Pro Elite to a computer? How can we extract the files and the reports straight to a computer?
The tablet doesn’t really want to allow you to connect to it but there are settings that will help us do.
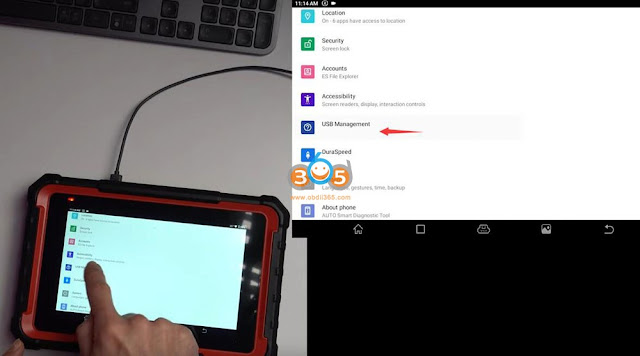
Again we drop down menu and find little setting mark.
We need to go to USB management, turn off USB switch (untick).
Then go to Connected devices->USB->select This device->File Transfer.
All of a sudden if your unit is connected to the computer you have access to it.
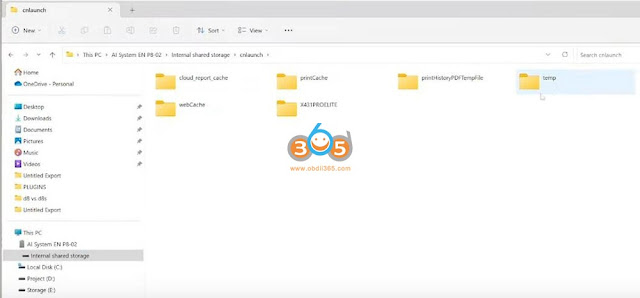
When you go in the root folder. If you want to have access to your health reports, you go to cnlaunch folder. You have part of your reports in print history PDF temp file and the rest of them are in the folder XX for X431ProElite.
And counterintuitively you’re going to find the files in a folder called images here is where we have the health reports and the CSV file.
4. Download Apps to the Tablet
We noticed that this tablet doesn’t have Google Play. We’ve searched for a place where we can get additional apps. The easiest or the one that we found on Google is this platform up to down.
It’s a platform that allows you to either install Google Play and install the apps from the Google Play.
You can download everything from this platform and after that install them on the tablet.
The process will be you download file on your computer, after that bring it to the tablet and with your file browser you’re are going to find the app that you want to install.
APK is the extension of that file. You just click on it install and you are able to use that App.
What we found quite important for us was an app to use as a flashlight as a torch and additionally you can install you YouTube, WhatsApp, Facebook, Messenger whatever you need for your specific task.
5. Export CSV file
One of the other things that we would like to share with you is how to export a CSV file natively you don’t have it in the menu.
Go to User Info->My reports->Recorded data.
Your data logging or whenever you record in the live streams and Parameters will be saved in this recorded data.
If you access it and select the values that you have been looking at you have on the right hand side the Export CSV file.
This will generate a file in our previously described folder. You copy that file on your computer and you are able to use it as information on the computer.
Hope this guide will give you a little bit more insight on how to maximize your use of a Launch X431 Pro Elite diagnostic scanner.
http://blog.obdii365.com/2024/09/26/connect-launch-x431-pro-elite-via-computer/


Comments
Post a Comment