What is the activation code for Launch X431 Smartlink VCI remote diagnosis? This is a frequent question of Launch X431 PAD VII.
The function is soon will be available for users abroad.
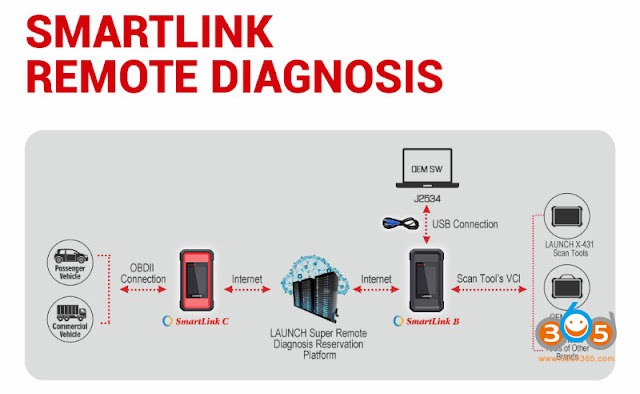
Smartlink 2.0 supports dual diagnosis mode: Local diagnosis & Super remote diagnosis.
Smartlink Remote Diagnosis Theory
This function allows users to diagnose vehicles from a thousand miles.
Here are the instructions to set up and use Launch Smartlink 2.0 Remote Diagnosis function.
1.It consists of three parts:
- Smartlink C (client end)
2)Smartlink B (business end)
3)Launch super remote diagnosis reservation platform
2. Compatible Launch Tablets:
Launch X431 Tablet with SmartLink (X431 PAD V/ X431 PAD VII/ X431 PRO5 smartlink)
Other Launch Product with SmartLink C/ SmartLink B
3. How to Activate?
- SmartLink C
Two ways to buy,
1)Renewal Card (1 Year)
In this way, the function will be valid within 1 year.
After the subscription expires, renew it or buy renewal card (smartlink connections)
2.Renewal Card (Smartlink Connections)
Active renewal card (free 3 connections included and they are invalid within 1 year)
After activation, users could buy 1/ 10/ 20/ 50 connections.
After connections run out, buy connections or buy renewal card (1 Year)
- SmartLink B
In this way, the function will be valid within 1 year.
After the subscription expires, renew it
*Renewal Card will be available on www.obdii365.com in May or June 2024, stay tuned!
4. How to Use?
- SmartLink C
Main steps:
Register->Login->Issue remote diagnostic request-> Wait for acceptance from technician
* In order to ensure the connection performance, we recommend 100M network bandwidth with upload/download speed no less than 10mbps.
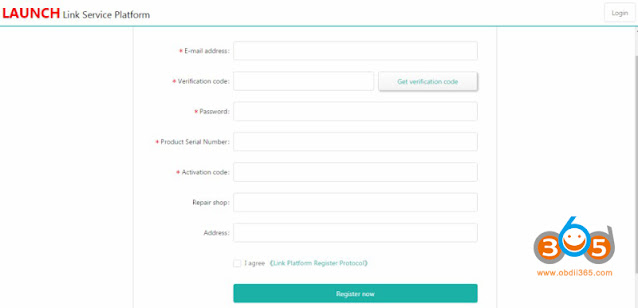
1) Register on “Launch Super Remote Diagnosis reservation platform” by link “http://smartlink.x431.com/login”
Input your email address and click “Get verification code”, platform will send the verification code to your email box. “Product Serial Number” and “Activation code” are pasted as “S/N” and
“A/C” on the rear side of Smartlink C device.
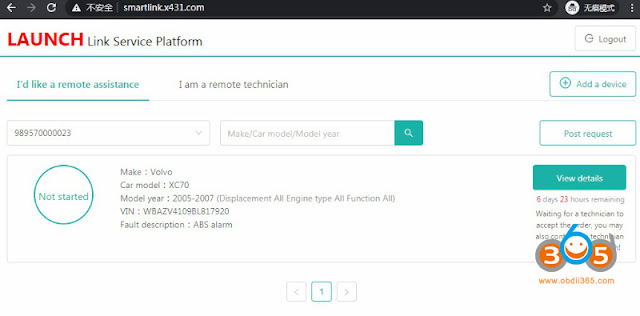
2) If you registered successfully, you can log in to the platform
If you have more Smartlink devices, you can click “Add a device” on this page, and then input
product serial number and activation code:
3)Now, you can post requests by click “Post request”
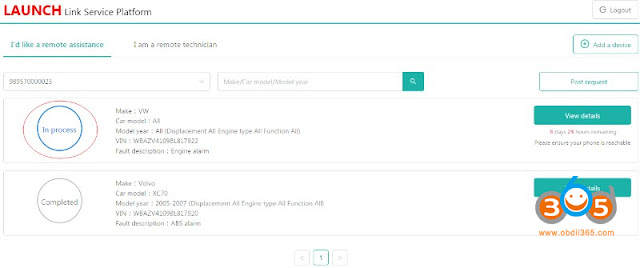
4) After you post a request, you have to wait until a professional technician accepts your request.
Your contact information will be forward to them for future communication. And the request status will change to “In Process”:
5)When you and the technician schedule the remote time, you have to connect Smartlink C to your vehicle and follow his/her instruction, such as ignition on/off, etc.
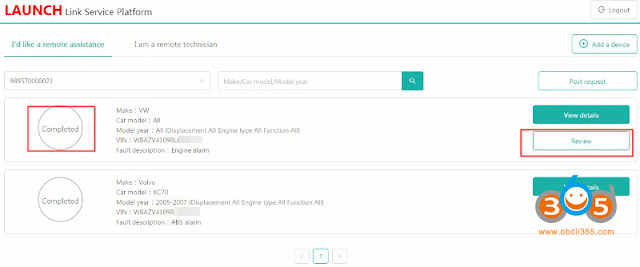
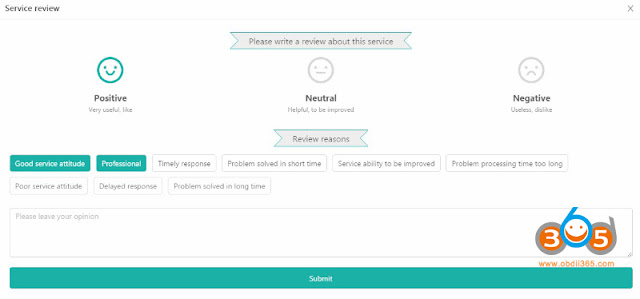
6)After the technician fixes your vehicle, you can post your review on the platform:
- SmartLink B
Main steps:
Register->Log in->Accept remote diagnostic request
*In order to ensure the connection performance, we recommend 100M network bandwidth with upload/download speed no less than 10mbps
1)Register on “Launch Super Remote Diagnosis reservation platform” by link” http://smartlink.x431.com/login “.
Input your email address and click “Get verification code”, platform will send the verification code to your email box. “Product Serial Number” and “Activation code” are pasted as “S/N” and
“A/C” on the rear side of Smartlink C device.
2)If you registered successfully, you can log in to the platform:
If you have more Smartlink devices, you can click “Add a device” on this page, and then input product serial number and activation code:
3)Now, you will find many requests on the platform. You can check the request details and
accept one that you can fix. Such as:
Remote Diagnosis Mode:
SmartlinkB_xxxxxx: it means you will use Smartlink B to take remote the client vehicle.
J2534 Remote diagnosis: it means you have installed OEM software and Launch Tech J2534 driver on your PC. You will take remote by J2534 protocol.
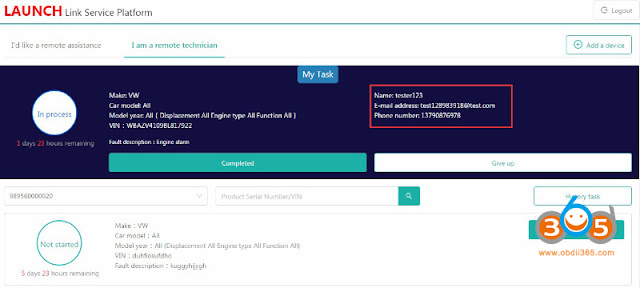
4): After you accept a request, you will get client contact information. You have to contact the client and guide them to fix the issue.
5)If you fix the vehicle issue, please click “Completed”. Or you may click “Give up” if you can’t solve it.
6)You can check diagnostic history by click “History task” on the main page.
Complete!
.jpg)







Comments
Post a Comment