
Launch X431 Tesla Cables Pinouts

Here comes the Launch X431 Tesla adapter function list and wiring diagrams. Hope it helps.


Content:

  • Launch X431 Tesla 12+20 connector
  • Launch X431 Tesla airbag reset adapter
  • Launch X431 Tesla 3 battery test cable
  • Launch X431 Tesla LAN adapters


To use these adapters you should have Tesla software activated on your Launch X431 scanners.

The software for “TESLA” is compatible with LAUNCH X431 PAD VIIPAD V, PAD II, X431 V 8inchX431 V+, X431 Pro5, Pros V1.0, Pros V5.0, Pro3s+, X431 Throttle etc)

launch x431 tesla software 1

Check how to purchase Tesla software and the supported vehicle list here

https://www.obdii365.com/wholesale/launch-x431-tesla-diagnostic-software.html


1. Launch Tesla 12+20 Connector

The Tesla 12+20 adapter is included in the Launch X431 EV kit

Launch Tesla 12+20 Connector

The connector can be used on Model S and Model X vehicles.

Function: 

Basic Function including ECU Information, Live Data, Read/ Erase Codes, as well as Special Functions including BMS Reset Alert, BMS Clear Contactor Stress Index, EPB Service Mode, Brake Bleed etc for Model X and Model S.

Check vehicle and function coverage here http://qcar.x431.com/qcar/#/


Wiring diagram:

Launch Tesla 12+20 Connector connection

1.12 PIN connector: (located below the central control screen) for diagnostics of pre-2015/Sept Model S and Model X

2. 20PIN connector: (located below the central control screen) for diagnostics of post-2015/Sept Model S and Model X


2.Tesla Airbag Reset Adapter

Launch Tesla airbag reset adapter

The Tesla airbag repair dedicated connector is mainly used to reset the airbag crash data.


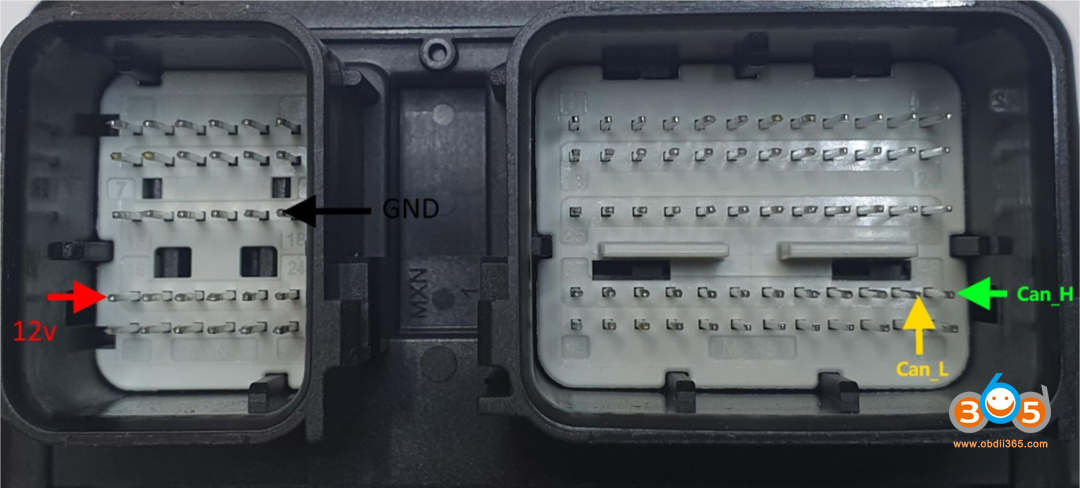
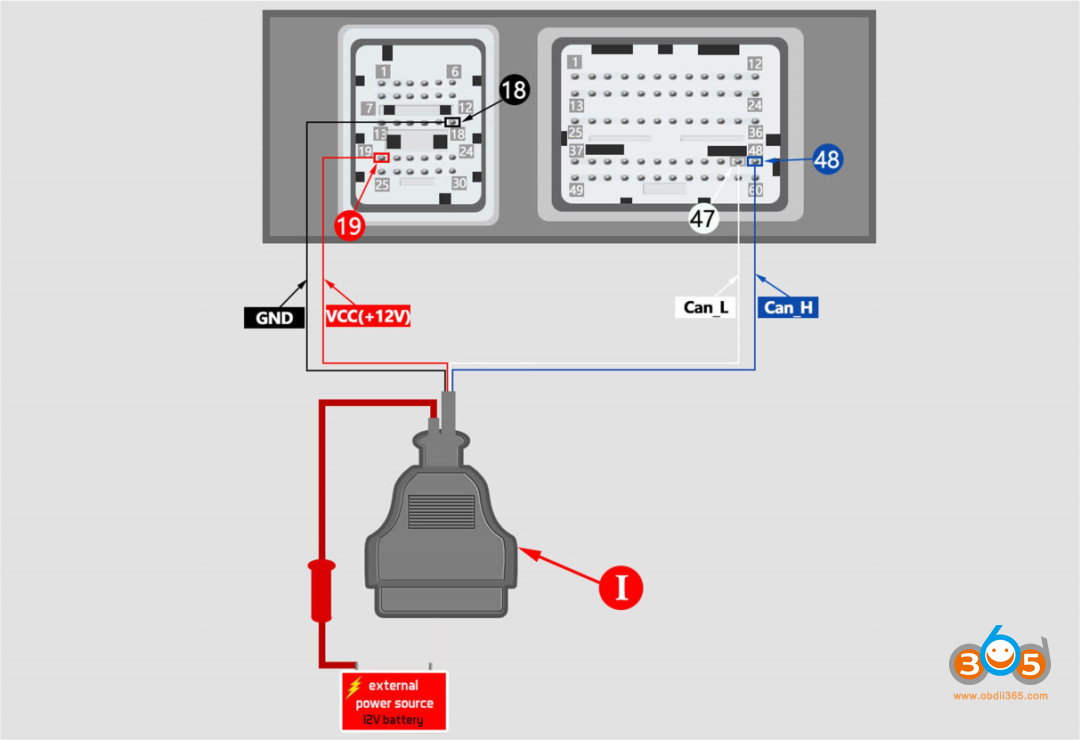
1). Model X airbag control module pinout

Launch Tesla model x airbag reset pinout

+12V: 12V Power

GND: Ground
CAN_H: CAN High
CAN_L: CAN LOW


Model X Tesla airbag connector connection diagram:

Launch Tesla model x airbag reset pinout 2

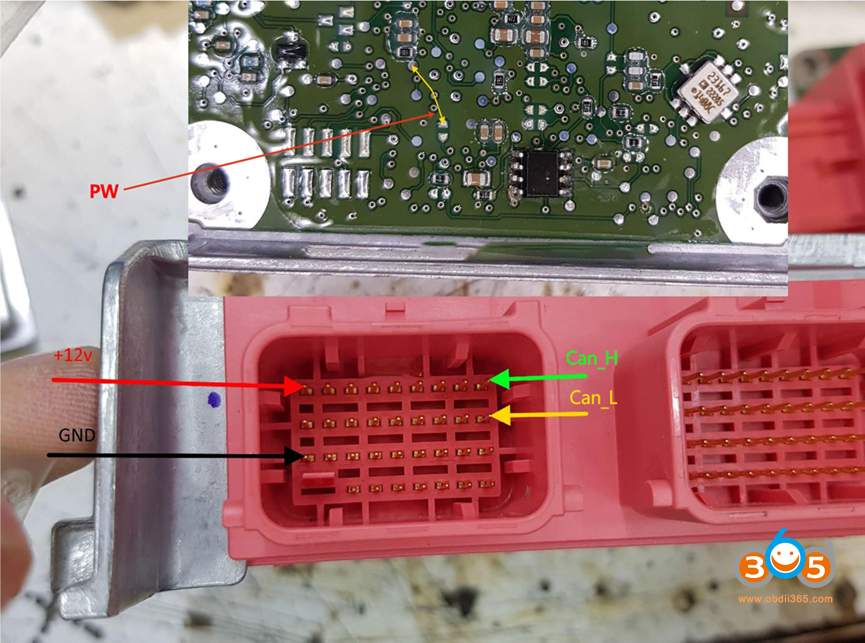
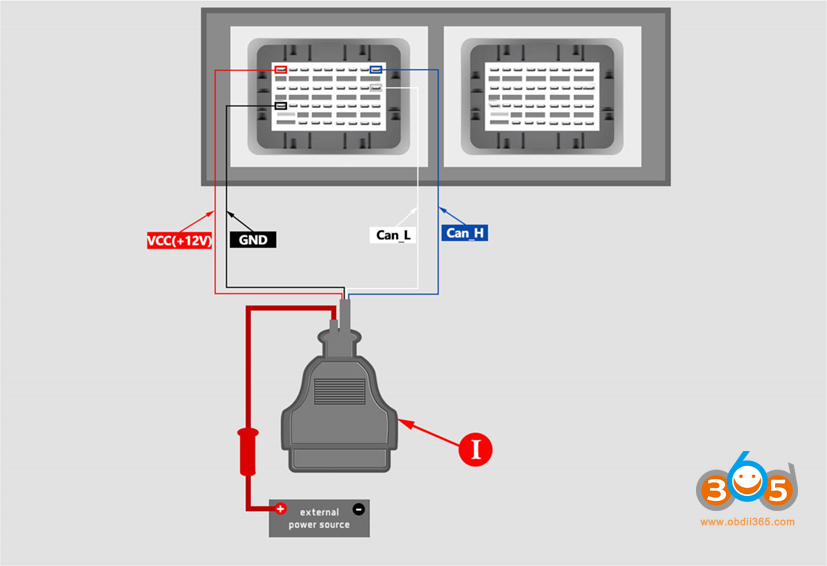
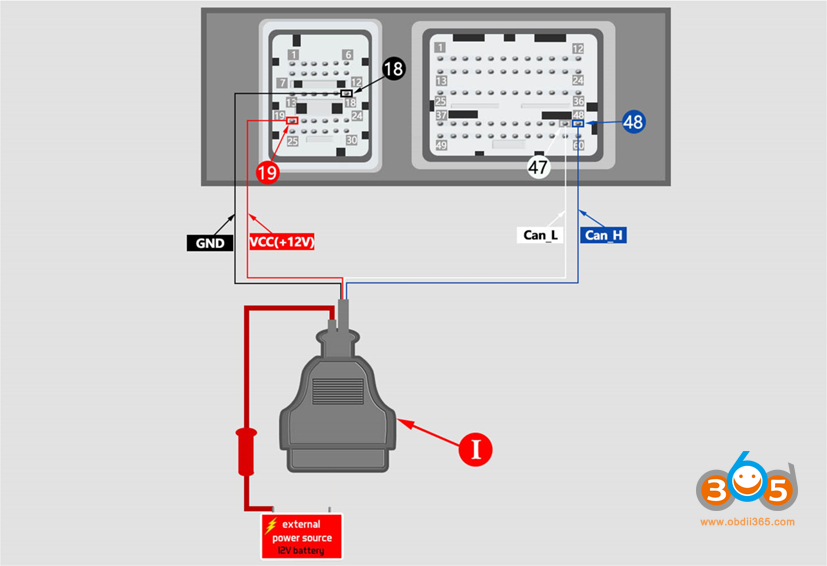
2). Model S airbag control module pinout

Launch Tesla model s airbag reset pinout 1

PW: Jump wire, short the two positions to enable it to write EEPROM;

+12V: 12V Power

GND: Ground
CAN_H: CAN High
CAN_L: CAN LOW


Model S Tesla airbag connector connection diagram:

Launch Tesla model s airbag reset pinout 2

Example:

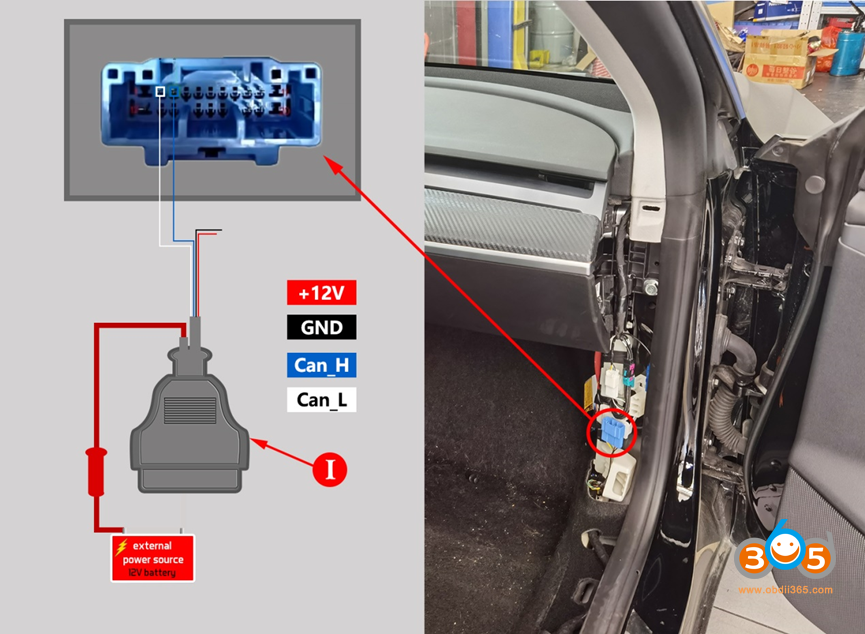
3). Model 3 airbag control module pinout

Launch Tesla model 3 airbag reset pinout 1

Model 3 Tesla airbag connector connection diagram:

Launch Tesla model 3 airbag reset pinout 2

4). Model 3/Y Airbag Unlock Wiring Diagram

Model 3/Y Airbag Unlock Wiring Diagram


3. Tesla 3 Battery Test Cable 152, RoHS

The cable is included in the Launch X431 EV kit

Tesla 3 Battery Test Cable 152, RoHS

This test cable is used to test the data flow of the three-electric system and test battery pack of Model 3 and Model Y models.

The EV kit is compatible with PAD V and PAD VII only at present.


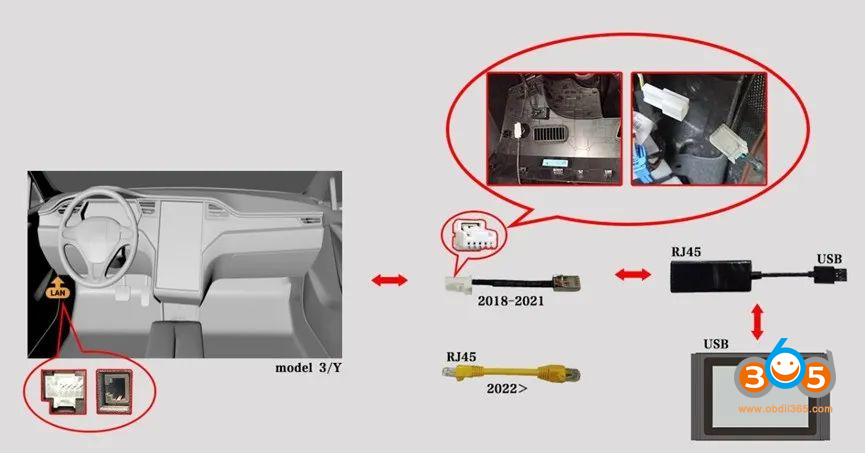
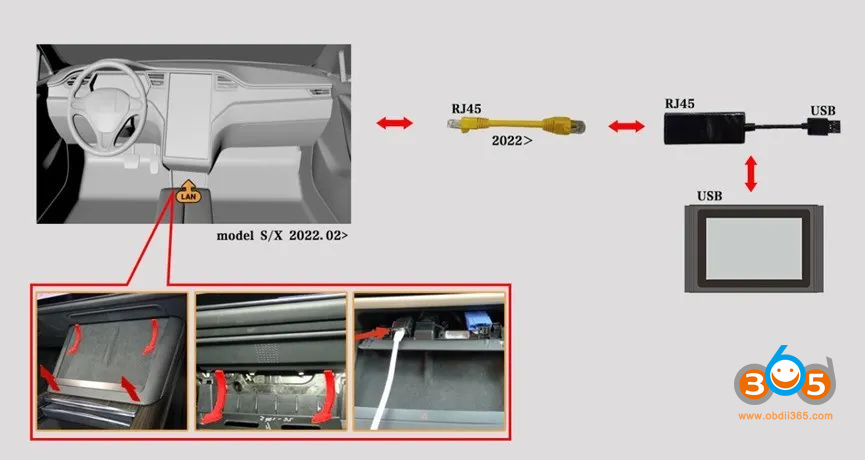
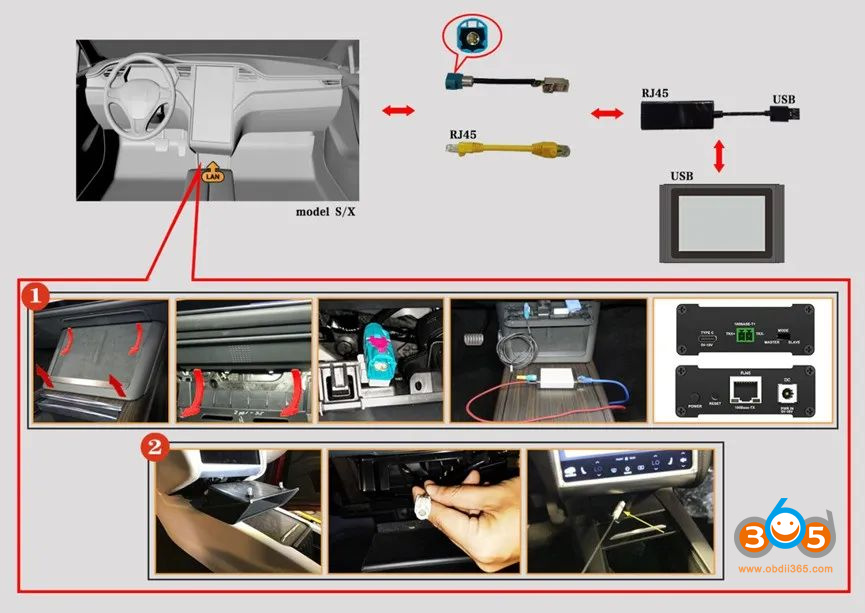
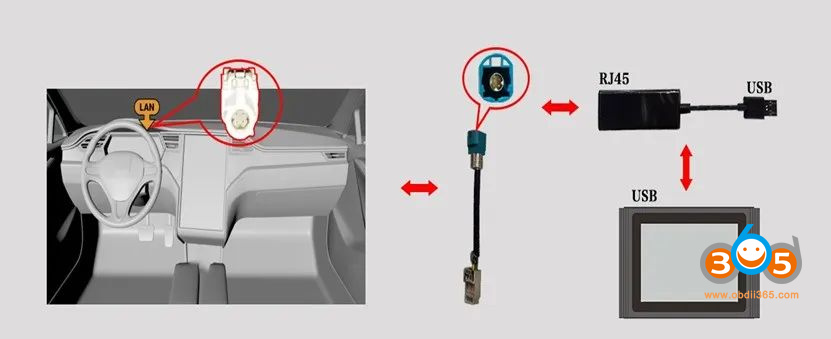
4. Launch X431 New Energy LAN network port diagnostic connector

Launch X431 New Energy LAN network port diagnostic connector

Used in local area network (LAN) function to enable Tesla Service Mode, currently supported products: X-431 PAD V, PAD VII series, EV MAX, X431 PRO 3S+ V3.0/V5.0 diagnostic equipment, Simplified Chinese, Traditional Chinese, Japanese, Korean, Arabic and Russian software.


Wiring diagrams

Launch X431 New Energy LAN network port diagnostic connector 2

1). 2018 onwards Model 3/Model Y

Launch X431 New Energy LAN network port diagnostic connector 3

2). 2022 onwards Model S/Model X

Launch X431 New Energy LAN network port diagnostic connector 4

3). 2018-2021 Model S/Model X

Launch X431 New Energy LAN network port diagnostic connector 5

4). 2014-2018 Model S/X Tegra chip MCU


www.obdii365.com

Comments

Popular posts from this blog

Install Launch X431 SmartLink C J2534 Driver

Launch X431 SmartLink C can be used as a J2534 PassThru device, working together with the PC installed with the OEM diagnostic software to perform the J2534 reprogramming.   Obdii365   shows where to download and how to install the Passthru SAE J2534 driver for LAUNCH X431 Smart Link C passthru adapter (for   PAD VII ) If you have Smartbox 3.0 (old PAD V and   X431 Pro5 ), download J2534 passthru   in the previous post .     How to Download Launch X431 SmartLink C J2534 passthru driver?   Same as smartbox 3.0, you need both installation programs (setup driver and PC tool for update).   1. Download PC tool for update (update smartlink c firmware) Visit   https://en.cnlaunch.com/ Select Products tab->X-431 PAD VII Pull down product information and find   Download Download   Smartlink J2534.zip Install Launch J2534 PC tool Run LAUNCH J2534 program on desktop. Now you can check Smartlink adapter version and update firmware 2. Download setup driver (J2534 passthru driver) Free download S

Will Lauch X-PROG3 Work with Diagzone, Xdiag or Prodiag?

Does Launch X431 X-prog3 work with xdiag, diagzone or prodiag activations?  Diagzone compatible xprog3? Is it working with prodiag? Will it work with xdiag? These are frequently asked questions of   Launch X-PROG3   (also called GIII) programmers. X-prog3 is compatible with Multiple X-431 Series   X-431 V ,  X-431 V+ ,   X431 Pro5 ,  X431 ProS ,   X431 Pro3s+ ,  X-431 PAD V ,  X-431 PAD VII , X-DIAG Pro3 diagnostic tablets. This programmer works not only for programming keys, but for working with ECU and gearbox. But when comes to key programming you need to know what you doing there is not too much info in the Diagzone/Prodiag software.   What worked and failed? Here are user reviews. *You are at your risk. We don’t provide technical support to 3rd party software.   Prodiag: Yes It works with prodiag. Prodiag provides usb connection with virtual comport. It works fine to read ECU and gearbox clone. For example, VAG DQ200 gearbox clone. Diagzone: Yes Diagzone does not provide usb conne

How to Make Porsche Coding Changes with Launch CRP919X CRP919E

 Instructions on Make Porsche Coding Changes using a Launch CRP919X , CRP919E , CRP919X BT , CRP919E BT scanners. Plugin X431 into OBD 2 Port, Turn Key to Accessory Mode and Wait until VIN is Determined then Hit the Back Arrow in the Upper Left Until You Get to the Next Screen Shown Below  Then select Diagnose (Although you may want to update the unit if updates are available) Then Scroll Down and select Porsche Then Select OK Then Select Automatically Search The Unit should determine the type of 718 you have and then Select OK Then Select System Selection Then Select the appropriate System for the Code you want to adjust (Note: This is the system listed in the instructions below such as Front-end Electronics, Rear-End Electronics, Instrument Cluster or Air Conditioning) Then select Code/Brush Hiding Then select Brush Hidden/Modified Then find the Code you want to adjust (These are the Codes in the instructions below) Then Make the Change Then Hit the Write Code Button