Launch X431 V+ Review on Sprinter 907 2019

I thought it would be a good idea to let everyone know about this Launch X431 V+ pro scan tool I originally bought a year or so ago mostly for working on non Sprinter related things like used cars at work, family vehicles, my own stuff.

My Launch x431 V Pro will clear those faults, assuming it’s the ones stored in the airbag module. I use it daily when I need to clear any kind of codes or figure out a simple problem that doesn’t need documents uploaded because I’m always using the xentry on something else and only have access to one xentry. The launch v+ has done great on everything I’ve used it on. Oh also free updates for 1 year on the one I bought.
Here’s a couple screenshots where I unplugged the Mercedes Sprinter 2019 W907 van driver’s seat SRS connector then cleared the codes.

Faults set by unplugging connector

Launch X431 V+ Review on Sprinter 907 2019 1


Clearing faults
Launch X431 V+ Review on Sprinter 907 2019 2
Faults cleared

Launch X431 V+ Review on Sprinter 907 2019 3

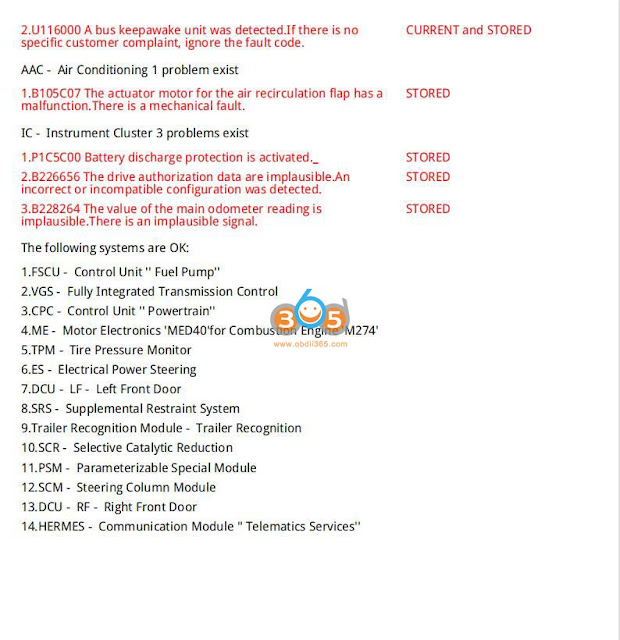
When you run a health report, it does detect all control modules as in Xentry. here’s the health report:
Launch X431 V+ Review on Sprinter 907 2019 health report 1
Launch X431 V+ Review on Sprinter 907 2019 health report 2
Most faults were just due to low battery voltage and a majority of the others are just erroneous faults. You’d be surprised how many fault codes are set in different modules on a normally functioning van. That’s why on these vans especially it’s important to focus only on faults relating to the concern otherwise you could be chasing your tail for days.
Over the past year I’ve discovered it is actually quite handy for several things on sprinters, both new and old. I have used it to reset mass airflow adaptations after fixing offset drift codes when the factory scan tool (Xentry) was giving me issues. I use it all the time for clearing faults after repairs and for performing regenerations while I’m busy using the Xentry. It also has a nice feature where it can record data/custom data lists and switch between graphing or numerical data and I can go back and look at data frame by frame leading up to a fault which is very handy since I am the only Sprinter tech at my shop with nobody to monitor data while I drive or vice versa. I’ll be happy to answer any questions or try a particular adaptation/reset for anybody considering the scan tool to verify it will do what they want. Please keep in mind I am the only Sprinter tech at our dealer and I’m drowning in AEMs and all the issues on the new 907 vans as well so I stay very busy so it may be a day or 2 before I get back to a particular request.
Also just to mention if for some reason somebody wants functions tested on the following I have access to these family vehicles: 2013 ecoboost F150, 2014 Buick Encore, 2005 Hyundai Tiburon, 2005 Kia Sorento EX, 2002 Ford Escape, 1995 Chevy Silverado (OBD1). I have diagnosed EVAP issues on the Sorento, misfires on the F150, DPFE issues on the Escape. I did DPF regeneration on Mercedes Benz Sprinter 906 2007. I also did a MAP reset on a 2008 Dodge Sprinter 3.0L diesel. Surprisingly, everything went back to Normal. I don’t see any Error code coming out now.
So far Launch X431 V+ has done great on everything I’ve tried it on.
http://blog.obdii365.com/2022/04/01/launch-x431-v-pro-review-on-mercedes-sprinter-907-vans/

Comments

Popular posts from this blog

Install Launch X431 SmartLink C J2534 Driver

Launch X431 SmartLink C can be used as a J2534 PassThru device, working together with the PC installed with the OEM diagnostic software to perform the J2534 reprogramming.   Obdii365   shows where to download and how to install the Passthru SAE J2534 driver for LAUNCH X431 Smart Link C passthru adapter (for   PAD VII ) If you have Smartbox 3.0 (old PAD V and   X431 Pro5 ), download J2534 passthru   in the previous post .     How to Download Launch X431 SmartLink C J2534 passthru driver?   Same as smartbox 3.0, you need both installation programs (setup driver and PC tool for update).   1. Download PC tool for update (update smartlink c firmware) Visit   https://en.cnlaunch.com/ Select Products tab->X-431 PAD VII Pull down product information and find   Download Download   Smartlink J2534.zip Install Launch J2534 PC tool Run LAUNCH J2534 program on desktop. Now you can check Smartlink adapter version and update firmware 2. Do...

Will Lauch X-PROG3 Work with Diagzone, Xdiag or Prodiag?

Does Launch X431 X-prog3 work with xdiag, diagzone or prodiag activations?  Diagzone compatible xprog3? Is it working with prodiag? Will it work with xdiag? These are frequently asked questions of   Launch X-PROG3   (also called GIII) programmers. X-prog3 is compatible with Multiple X-431 Series   X-431 V ,  X-431 V+ ,   X431 Pro5 ,  X431 ProS ,   X431 Pro3s+ ,  X-431 PAD V ,  X-431 PAD VII , X-DIAG Pro3 diagnostic tablets. This programmer works not only for programming keys, but for working with ECU and gearbox. But when comes to key programming you need to know what you doing there is not too much info in the Diagzone/Prodiag software.   What worked and failed? Here are user reviews. *You are at your risk. We don’t provide technical support to 3rd party software.   Prodiag: Yes It works with prodiag. Prodiag provides usb connection with virtual comport. It works fine to read ECU and gearbox clone. For example, VAG DQ200 gearb...

How to Make Porsche Coding Changes with Launch CRP919X CRP919E

 Instructions on Make Porsche Coding Changes using a Launch CRP919X , CRP919E , CRP919X BT , CRP919E BT scanners. Plugin X431 into OBD 2 Port, Turn Key to Accessory Mode and Wait until VIN is Determined then Hit the Back Arrow in the Upper Left Until You Get to the Next Screen Shown Below  Then select Diagnose (Although you may want to update the unit if updates are available) Then Scroll Down and select Porsche Then Select OK Then Select Automatically Search The Unit should determine the type of 718 you have and then Select OK Then Select System Selection Then Select the appropriate System for the Code you want to adjust (Note: This is the system listed in the instructions below such as Front-end Electronics, Rear-End Electronics, Instrument Cluster or Air Conditioning) Then select Code/Brush Hiding Then select Brush Hidden/Modified Then find the Code you want to adjust (These are the Codes in the instructions below) Then Make the Change Then Hit the Write Code Button