LAUNCH X-PROG3 has an important update- VW Audi MQB gearbox replacement. With this important update, after replacing the control module of the transmission, which is commonly installed in various models of the VW Group, it is now possible to adapt it to the vehicle by using the X-PRO G3 together with X431 tablets (X431 PAD V, PAD VII etc).
(Before the update, only a limited number of control modules were available). Not only new but also used control modules can be adapted. The BOSCH engine control module can also be adapted to the vehicle, both new and used. According to a LAUNCH study, as of May 2021, no other competing tester manufacturer’s product can do this.

Here we take the DQ200-MQB Gearbox as an example, replace its ECU and finish the settings.
Tools Requirement:
X-431 Pad V/PAD VII and X-PRO G3
Software Requirement:
Audi V28.70 and above, IMMO PROGRAM V10.02 and above.
A Brief Introduction:
There are two kinds of gearbox ECU replacements, and the customer can choose one of them according to the actual situation
1). The data of the customer’s original vehicle gearbox ECU is readable. Data is not damaged, and the gearbox can be cloned. In this situation, we just need to back up the original gearbox EEPROM and FLASH, and then restore them into the gearbox ECU for replacement.
2). The data of the customer’s original vehicle gearbox ECU is unreadable or the data is damaged. In this situation, we need to back up the EEPROM of the ECU for replacement, and then manually input the original CS code or get the original CS code from the original key.
Operation Steps:
Situation 1: the customer’s original vehicle gearbox data is readable and the data is not damaged, the gearbox can be cloned
1. Enter [Service Function], find [IMMO PROGRAM], then [Anti-Theft Key Matching Adaptor]
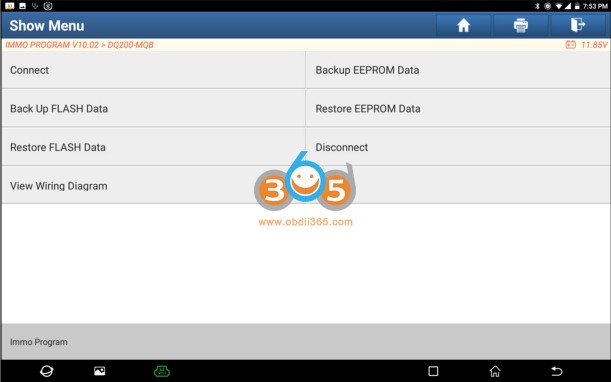
2.Select [Gearbox], and then select Gearbox type according to the specific model, here we choose [DQ200-MQB] to enter the function menu. As shown in the below figure:

3.Click [View Writing Diagram], follow the connection diagram to connect the original car gearbox ECU with the anti-theft programmer(X-PRO G3) and diagnostic equipment, click [OK], the connection diagram and physical diagram are as shown in the following figure:


4.Click [Connect], click [OK] after reading the chip ID of the original car gearbox, as shown in the figure

5.Click [Backup EEPROM Data] in this menu interface, read the EEPROM data of the original car gearbox, enter the file name to be saved, click [OK], select the path where the file is to be stored, and click [OK] to save. As shown below:


6.Click [Backup FLASH Data] to back up the FLASH data of the original vehicle gearbox, and the operation is the same as above.
7. Click [Disconnect] to disconnect the original vehicle gearbox, and then disconnect the original vehicle gearbox from the BENCH mode line.
8. Connect the gearbox ECU for replacement to the anti-theft programmer according to the steps 3 and 4.
9. After connecting the gearbox ECU for replacement, click [Restore EEPROM Data] on the function menu interface of DQ200-MQB, select the EEPROM data backed up in step 5, and click [OK] to write the EEPROM data of the original vehicle gearbox In the new gearbox, as shown in the figure:

10. Click [Restore FLASH Data] to write the FLASH data of the original vehicle gearbox backed up in step 6 into the gearbox ECU for replacement. The operation steps are the same as step 9,
as shown in the following figure:


Situation 2: The data of the customer’s original vehicle gearbox ECU is unreadable or the data is damaged. In this situation, we need to back up the EEPROM of the ECU for replacement (we call it new gearbox ECU here), and then manually input the original CS code or get the original CS code from the original key.
1. Enter “Service Function”, find “IMMO PROGRAM”, and choose [Anti-Theft Key Matching Adaptor].
2. Select [Gearbox], and then select Gearbox type according to the specific model, here we choose [DQ200-MQB] to enter the function menu.
3. Click [View Writing Diagram], then connect the new gearbox ECU with X-PRO G3, X-431 Pad V as the below image.
4.Then click [Connect], click [OK] after read out the ID of the new gearbox ECU chip.
5.Click [Backup EEPROM Data] in this menu, read the EEPROM data of the new gearbox, enter the file name to be saved, click [OK], select the path where the file is to be stored, and click
[OK] to save, as shown in the figure below Show:
6.Exit the [Special Function], enter the local diagnosis, enter the Volkswagen software, select [Special Function]>>[Anti-Theft Function], click [OK], enter the main menu of the anti-theft
system, select [MQB Instrument], click [OK]. Select [Replacement Of Parts]>>[Transmission], click [OK], click [YES] to enter the gearbox replacement page, as shown in the figure:


7. Select [Edit1], click [NO], click [Obtain From EEPROM Data], select the new gearbox EEPROM data backed up in step 5, and click [OK], as shown in the figure:


8. Click [Edit2], if you have obtained the relevant data of the original vehicle gearbox from other equipment, select [Manual Input Data] and enter the 16-byte CS code of the original vehicle
gearbox, as shown in the figure below: (Note: If there is no anti-theft data of the target vehicle, select [Original Vehicle Key Obtained], put the original vehicle key in the anti-theft programmer G3, and just follow the information prompts to complete, no need to enter any data to complete the replacement)


9. Click the [Start Replacement] button, and input the original car’s VIN code, power level and CS code of the original car instrument according to the information prompts to complete the
gearbox replacement, as shown in the figure:

Done.
Read also:
How to Reset Mercedes Benz Engine ECU with Launch X431 and X-PROG3?
Comments
Post a Comment